
Help
How to Sign Up, Step by Step
Real pictures of every screen, with red arrows showing exactly what goes in each box — from your free assessment to your first update.
Signing up, step by step
Every screen below is a picture of the real screen you’ll see, with small red numbered arrows pointing to each box and the matching instructions underneath. Most people finish in about 15 minutes.
To protect your privacy, please never type your Social Security number or full account numbers into any box. (Prices in these pictures are hidden — see the Pricing menu at the top of the page.)
Before you start, have these ready
- An email address you can open right now (for 6-digit codes).
- Your cell phone, if you want text-message codes.
- A photo of your driver’s license or state ID (front).
- A recent proof of address — a utility bill, bank statement or lease with your name and current address.
- Your credit reports if you already have them (or you’ll set up credit monitoring in step 7).
- A debit or credit card for your monthly payments (charged only after the work for that month is done).
Your free assessment — Step 1 of 3
Go to Get Started. The first step asks what you want help with.
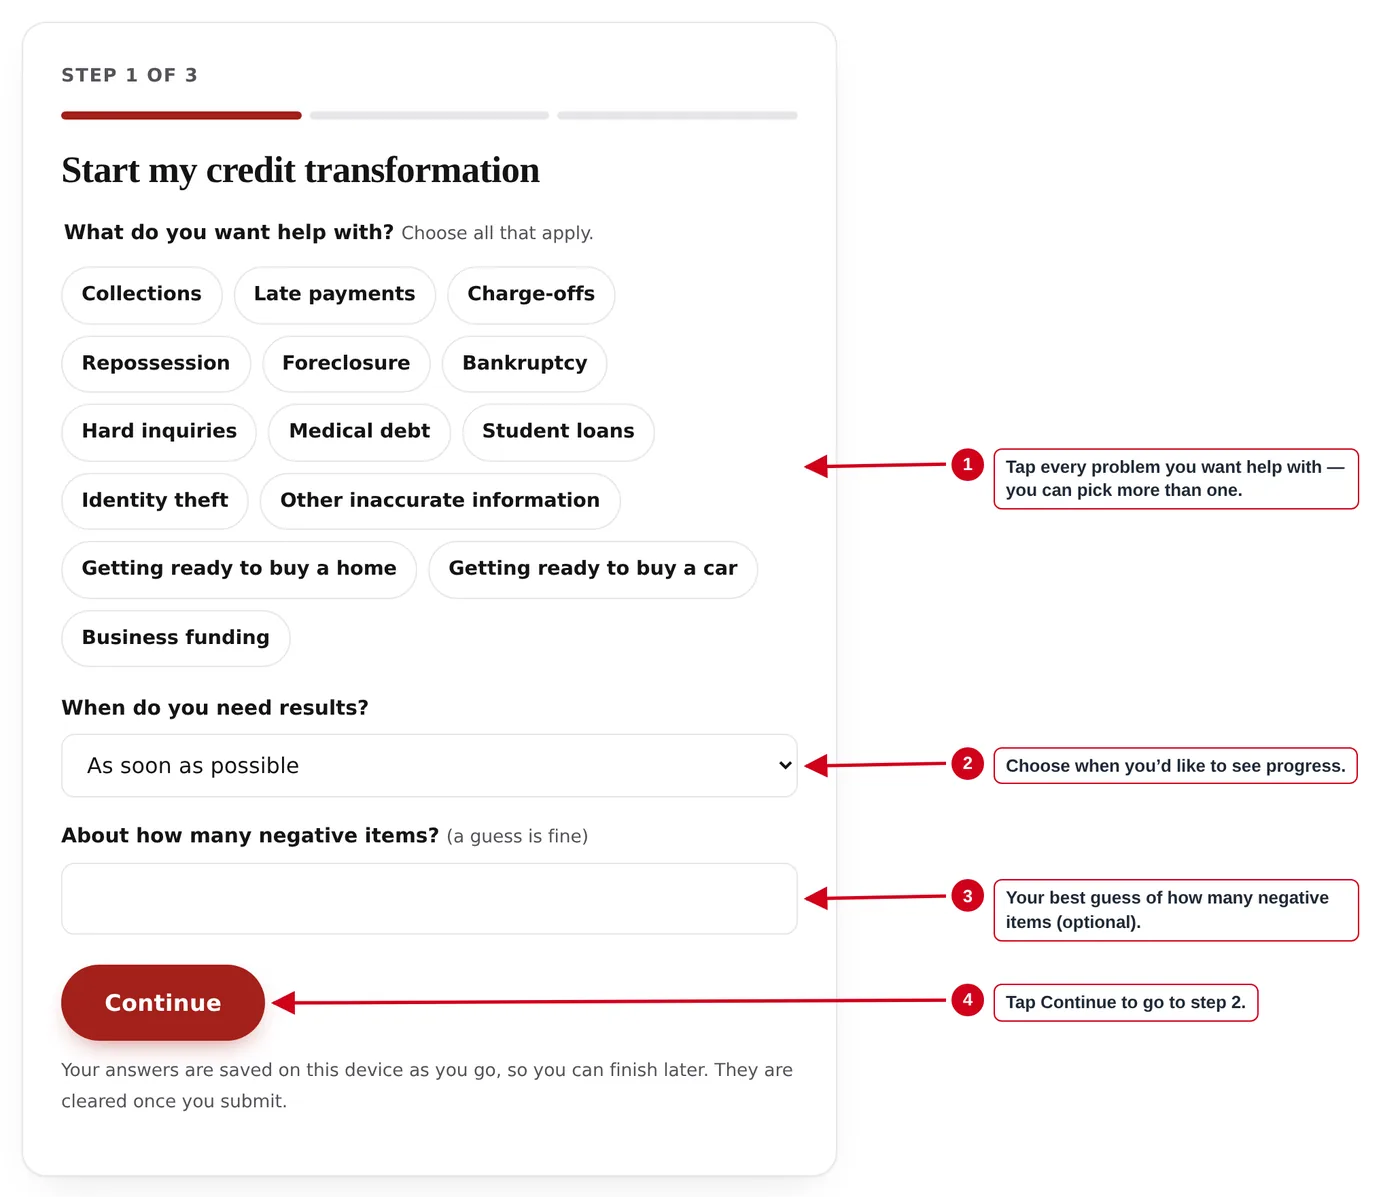
- What do you want help with? Tap every problem that applies — collections, late payments, charge-offs, and so on. Tapped buttons turn red. You can pick as many as you like.
- When do you need results? Choose the option closest to your plans (for example “In the next 6 months” if you’re buying a home).
- About how many negative items? A rough guess is fine — or leave it blank.
- Tap Continue.
Free assessment — Step 2 of 3
Tell us a little more. Everything on this step is optional.
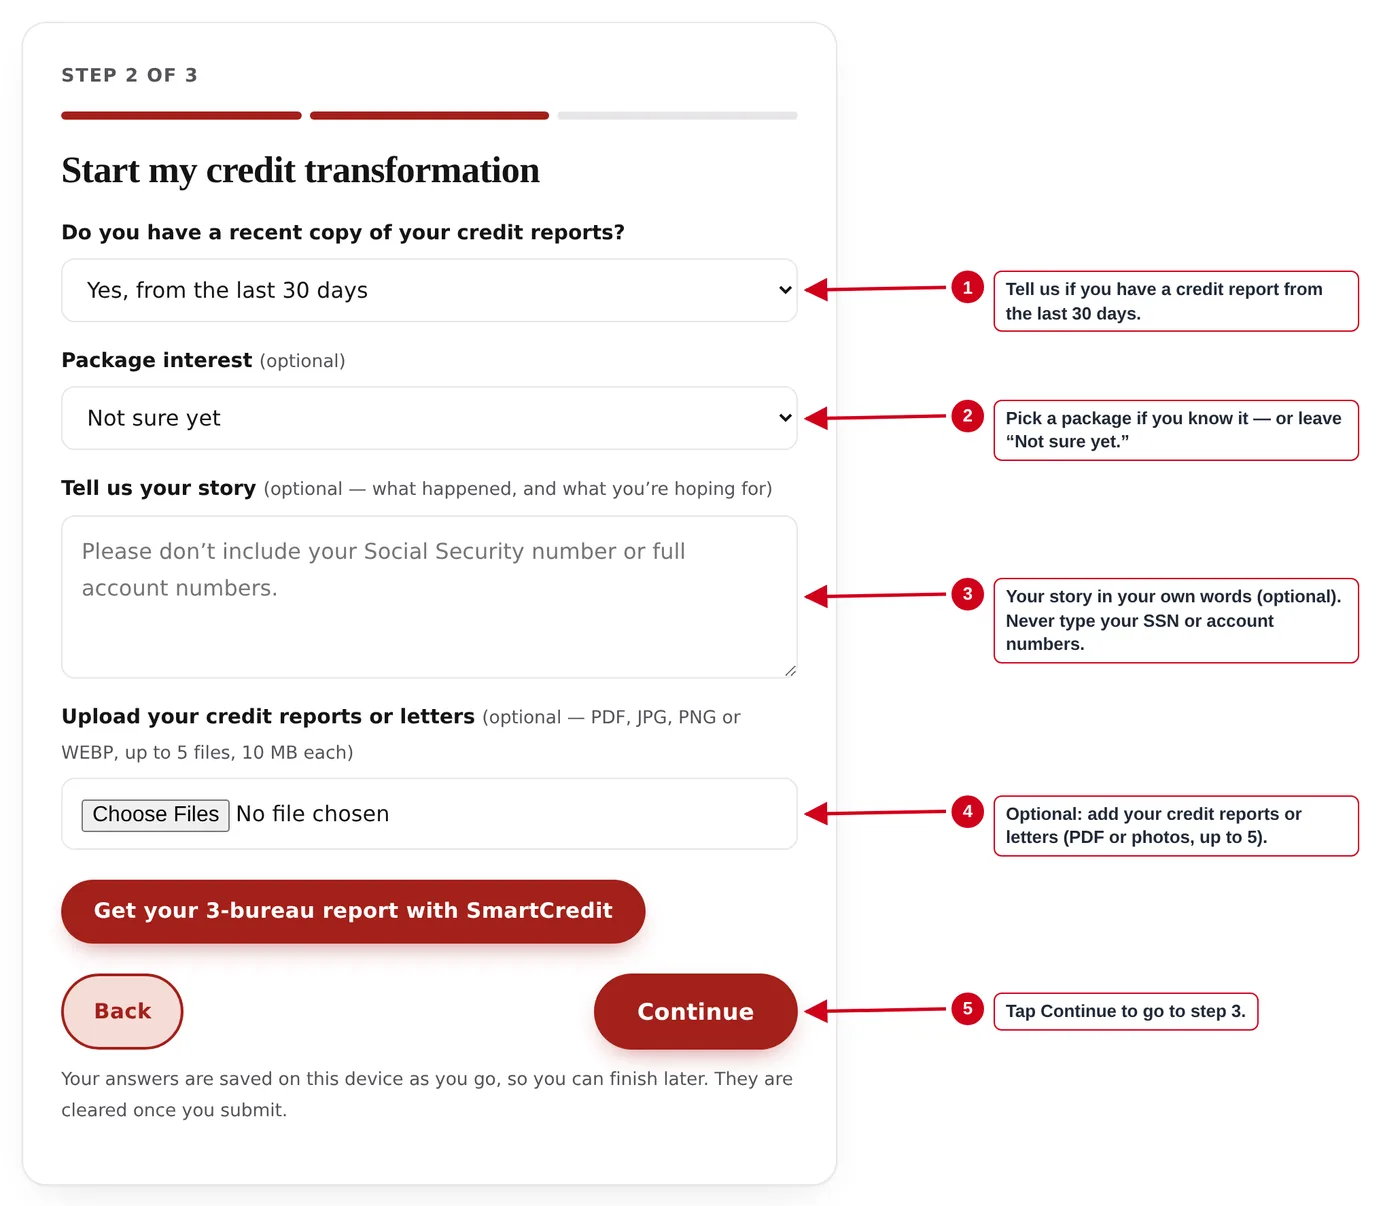
- Do you have a recent copy of your credit reports? Choose Yes if you pulled them in the last 30 days.
- Package interest — pick one if you already know, or leave “Not sure yet.”
- Tell us your story — what happened and what you’re hoping for, in your own words. Never include your Social Security number or account numbers.
- Upload — optional: add your credit reports or letters from creditors (PDF or clear phone photos, up to 5 files, 10 MB each).
- Tap Continue.
Tip: Your answers are saved on your device as you go. If you get interrupted, come back to the page and pick up where you left off.
Free assessment — Step 3 of 3
Your contact details, so we can reach you.
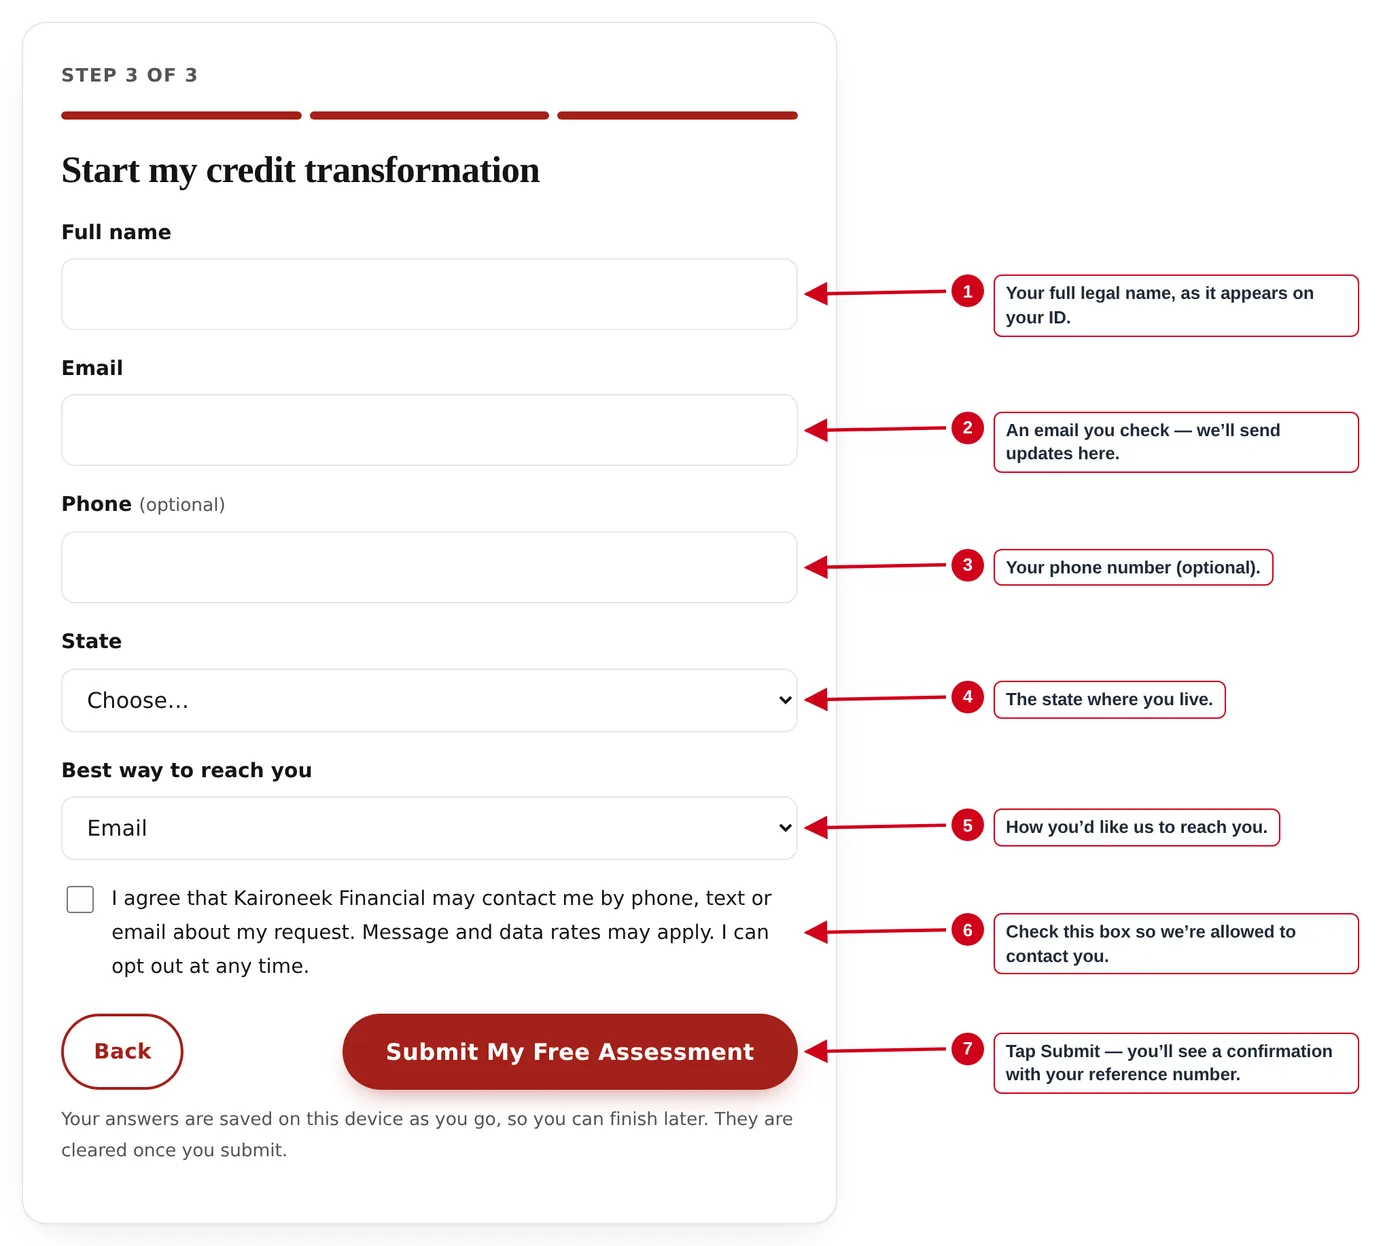
- Full name — your full legal name, exactly as it appears on your ID.
- Email — an email you check often. Use this same email when you create your account in the next step.
- Phone — optional.
- State — the state where you live.
- Best way to reach you — phone call, text or email.
- Check the box so we’re allowed to contact you about your request.
- Tap Submit My Free Assessment. You’ll see a thank-you message with a reference number — write it down.
Create your secure portal account
Open your client portal from Client Login at the top of any page and tap Create Account.
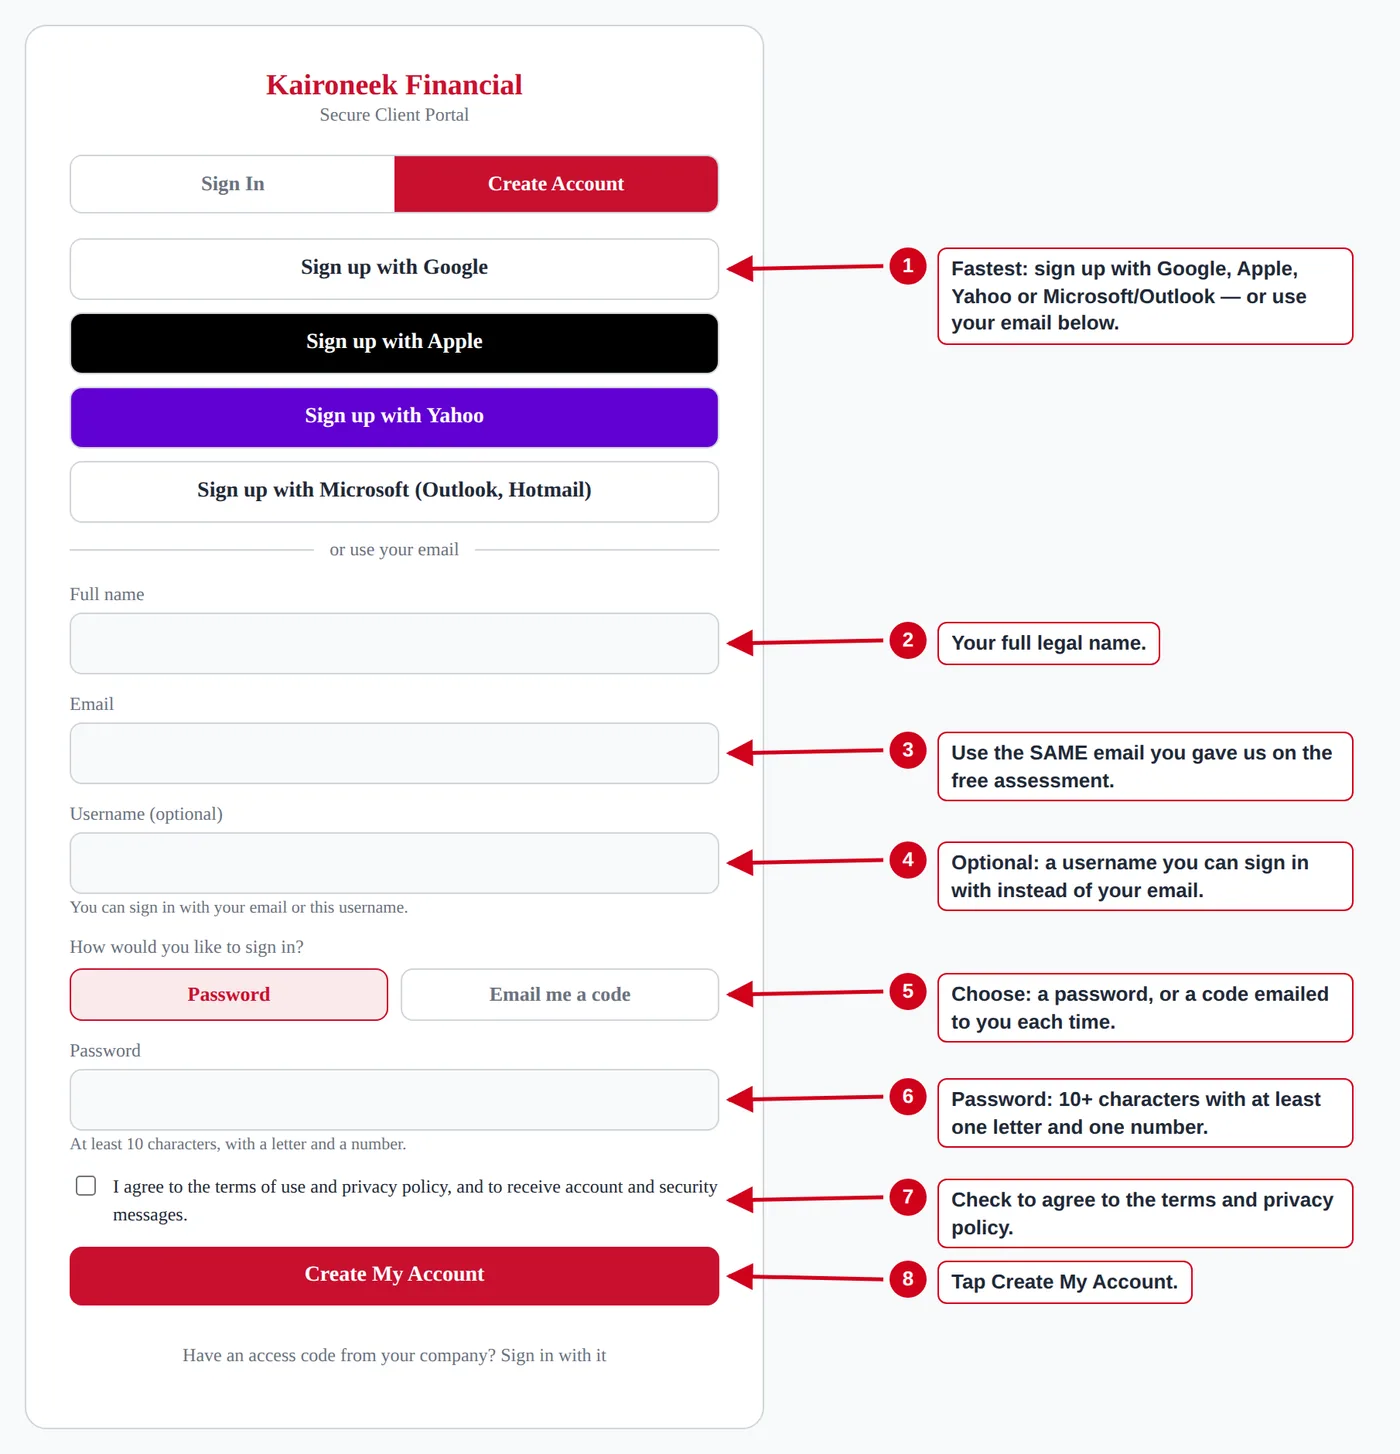
- Fastest: tap “Sign up with Google,” “Apple,” “Yahoo” or “Microsoft (Outlook, Hotmail)” and follow the prompts — then skip to two-step verification. Or fill in the boxes below.
- Full name — your full legal name.
- Email — use the same email you gave on your free assessment, so your account connects to your file automatically.
- Username — optional. If you add one, you can sign in with it instead of your email.
- How would you like to sign in? Choose Password, or Email me a code if you’d rather not have a password — we’ll email you a 6-digit code each time.
- Password (only if you chose Password) — at least 10 characters with at least one letter and one number.
- Check the box to agree to the terms of use and privacy policy.
- Tap Create My Account.
Confirm your email
We email you a 6-digit code to make sure the address is really yours.
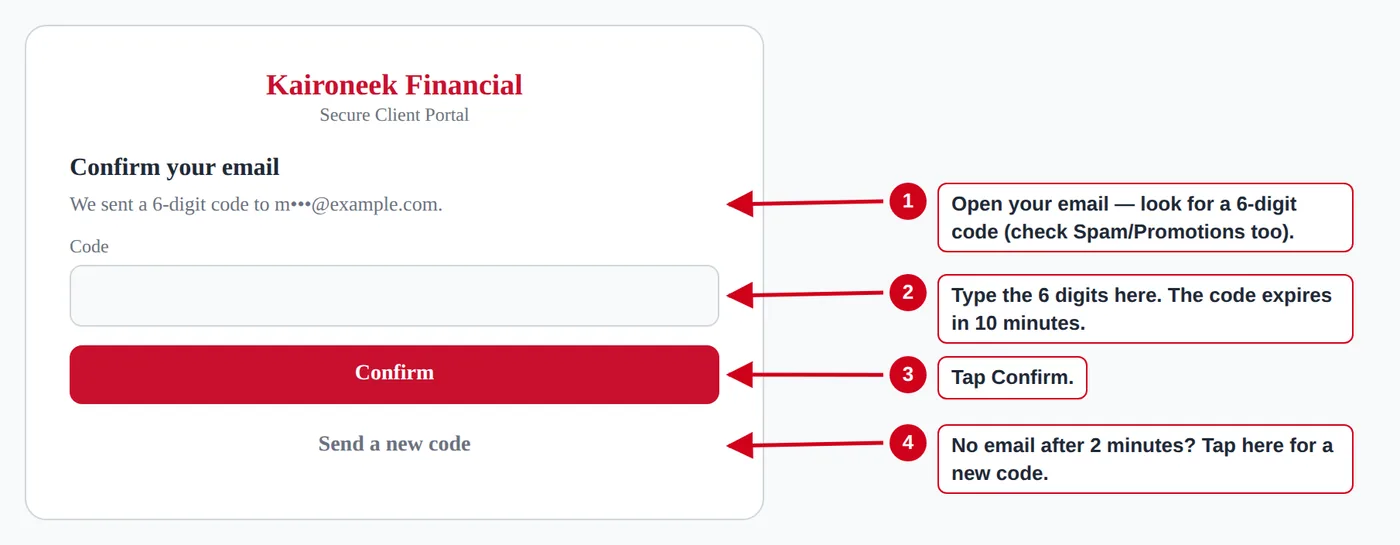
- Open your email and find the message with your 6-digit code. Check Spam, Junk and Promotions if you don’t see it.
- Type the 6 digits into the Code box. Codes expire after 10 minutes.
- Tap Confirm.
- No email after 2 minutes? Tap Send a new code and use the newest one.
Turn on two-step verification
Every account uses a second step when signing in, so no one can get into your file with just your password. Choose one:
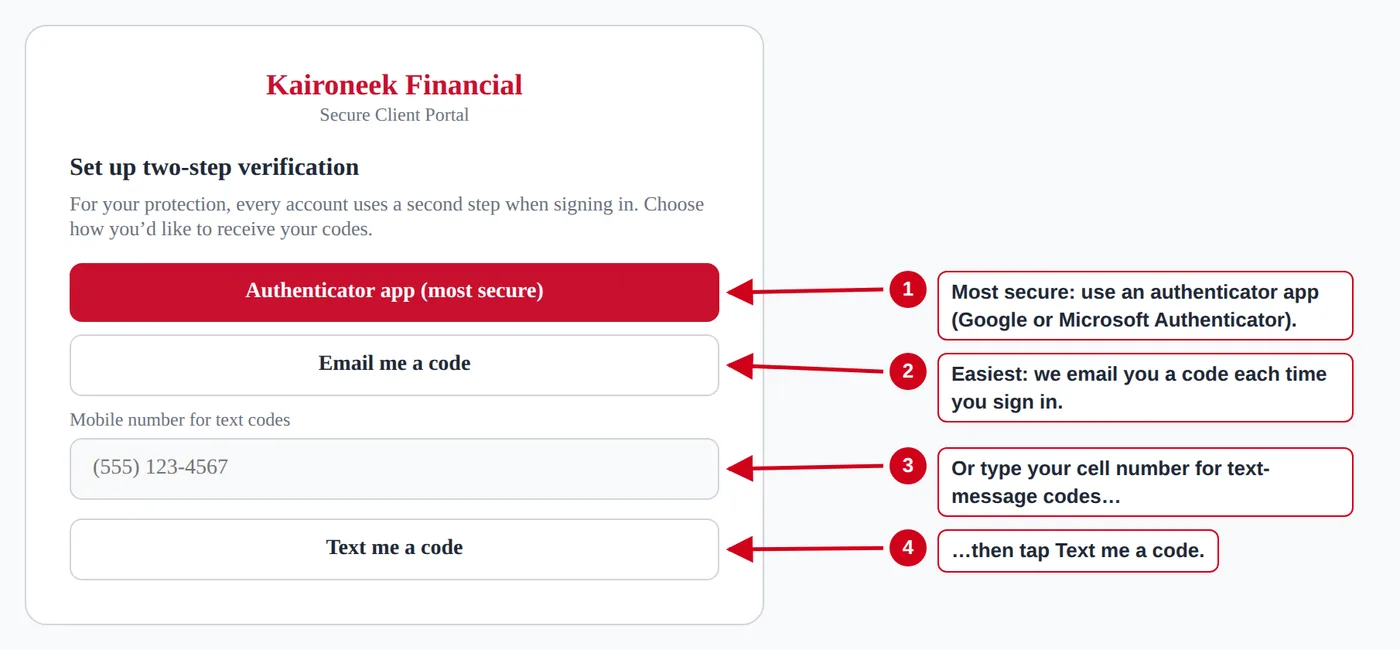
- Authenticator app (most secure) — scan the square code with Google Authenticator, Microsoft Authenticator, Authy or 1Password, then type the 6-digit code it shows.
- Email me a code (easiest) — we email you a code each time you sign in.
- Text message — type your cell number here…
- …then tap Text me a code and type the code we text you.
Tip: After you finish, you’ll see backup codes. Write them down or save them somewhere safe — each one lets you sign in once if you lose your phone.
Signing in next time
Open Client Login and choose Sign In.
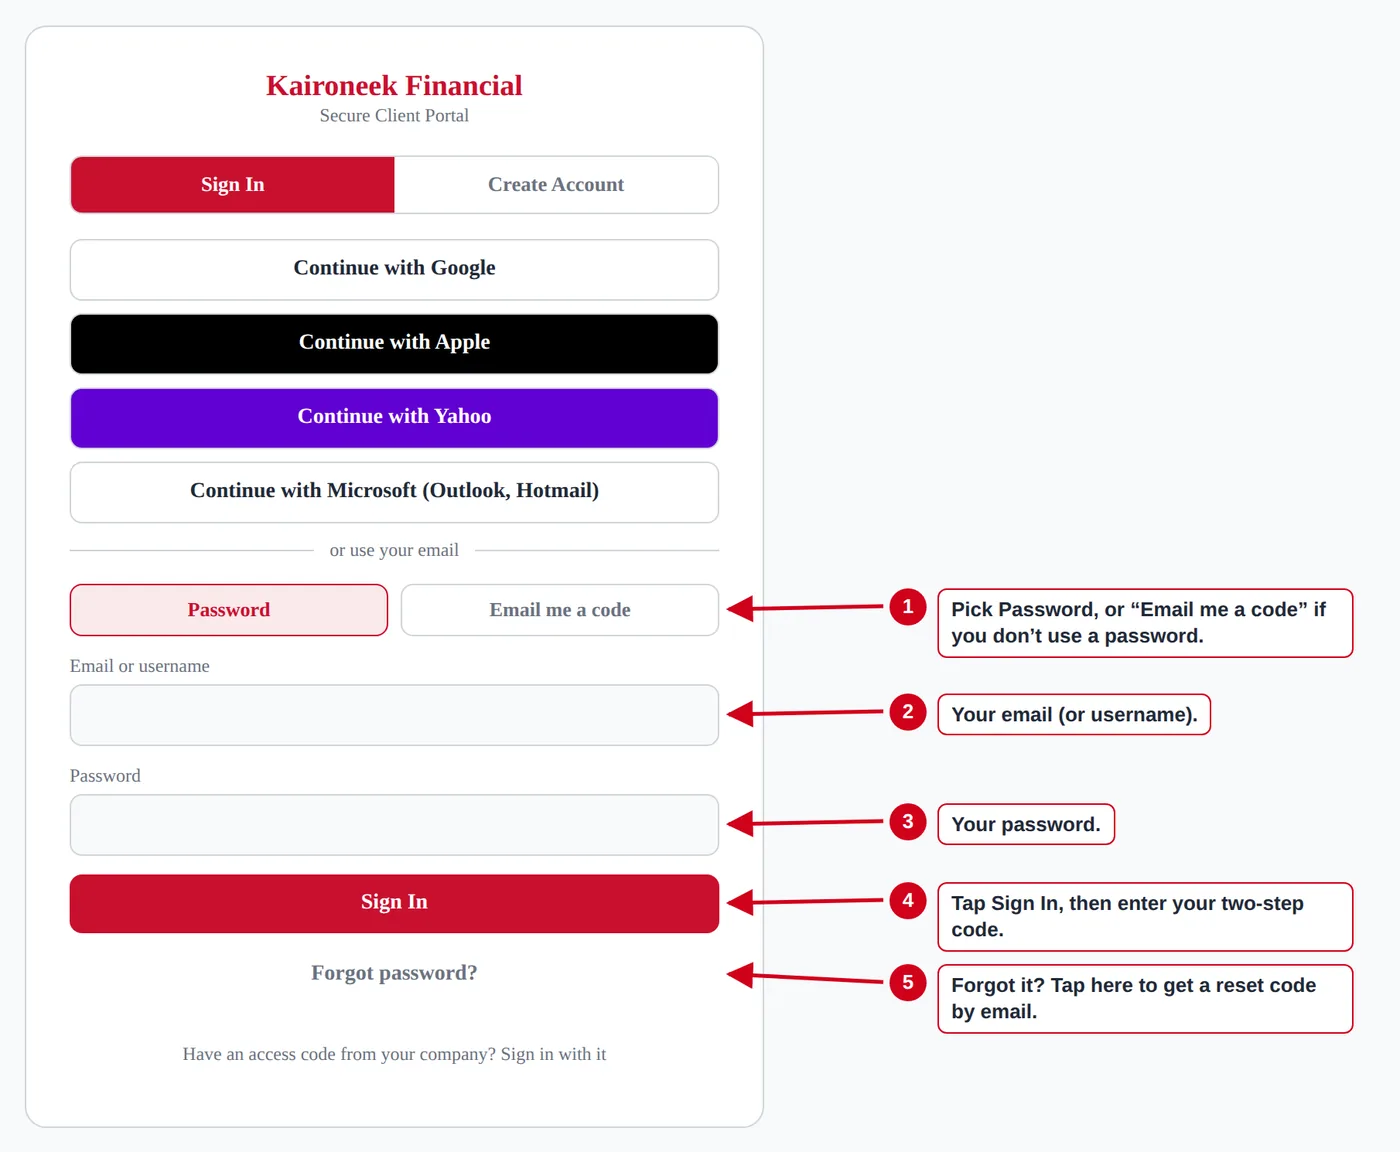
- Choose Password, or Email me a code to sign in without a password.
- Type your email or username.
- Type your password (or, if you chose a code, tap “Email Me a Sign-In Code” and type the code).
- Tap Sign In, then enter your two-step code.
- Forgot your password? Tap Forgot password? and we’ll email you a reset code.
Review and sign your agreement
Once your file is ready, your agreement appears when you sign in. The law requires it to come as separate documents, in this order. It takes about 5 minutes, and you can stop and come back.
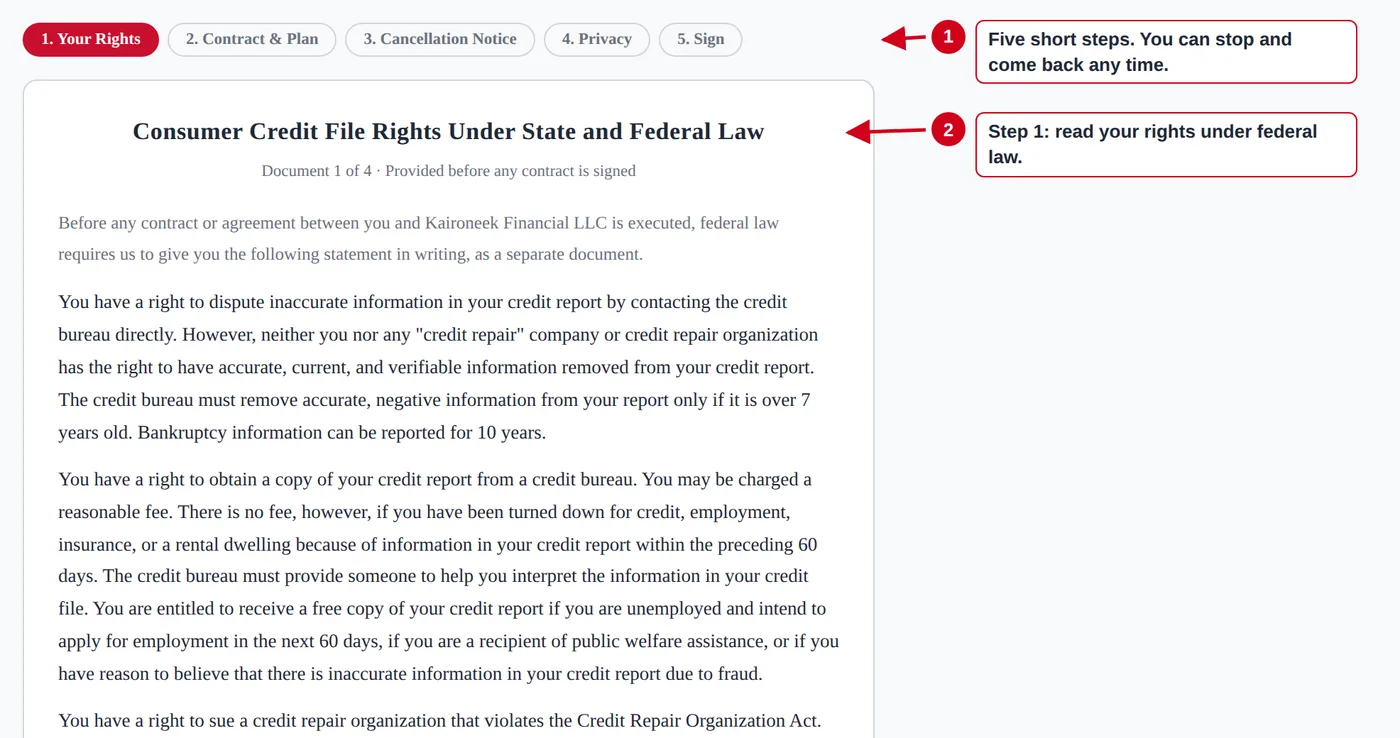
- The five steps are shown at the top: Your Rights → Contract & Plan → Cancellation Notice → Privacy → Sign.
- Your Rights — the “Consumer Credit File Rights Under State and Federal Law” statement. Read it through.
- Check the box to confirm you received it…
- …then tap I Acknowledge — Continue.
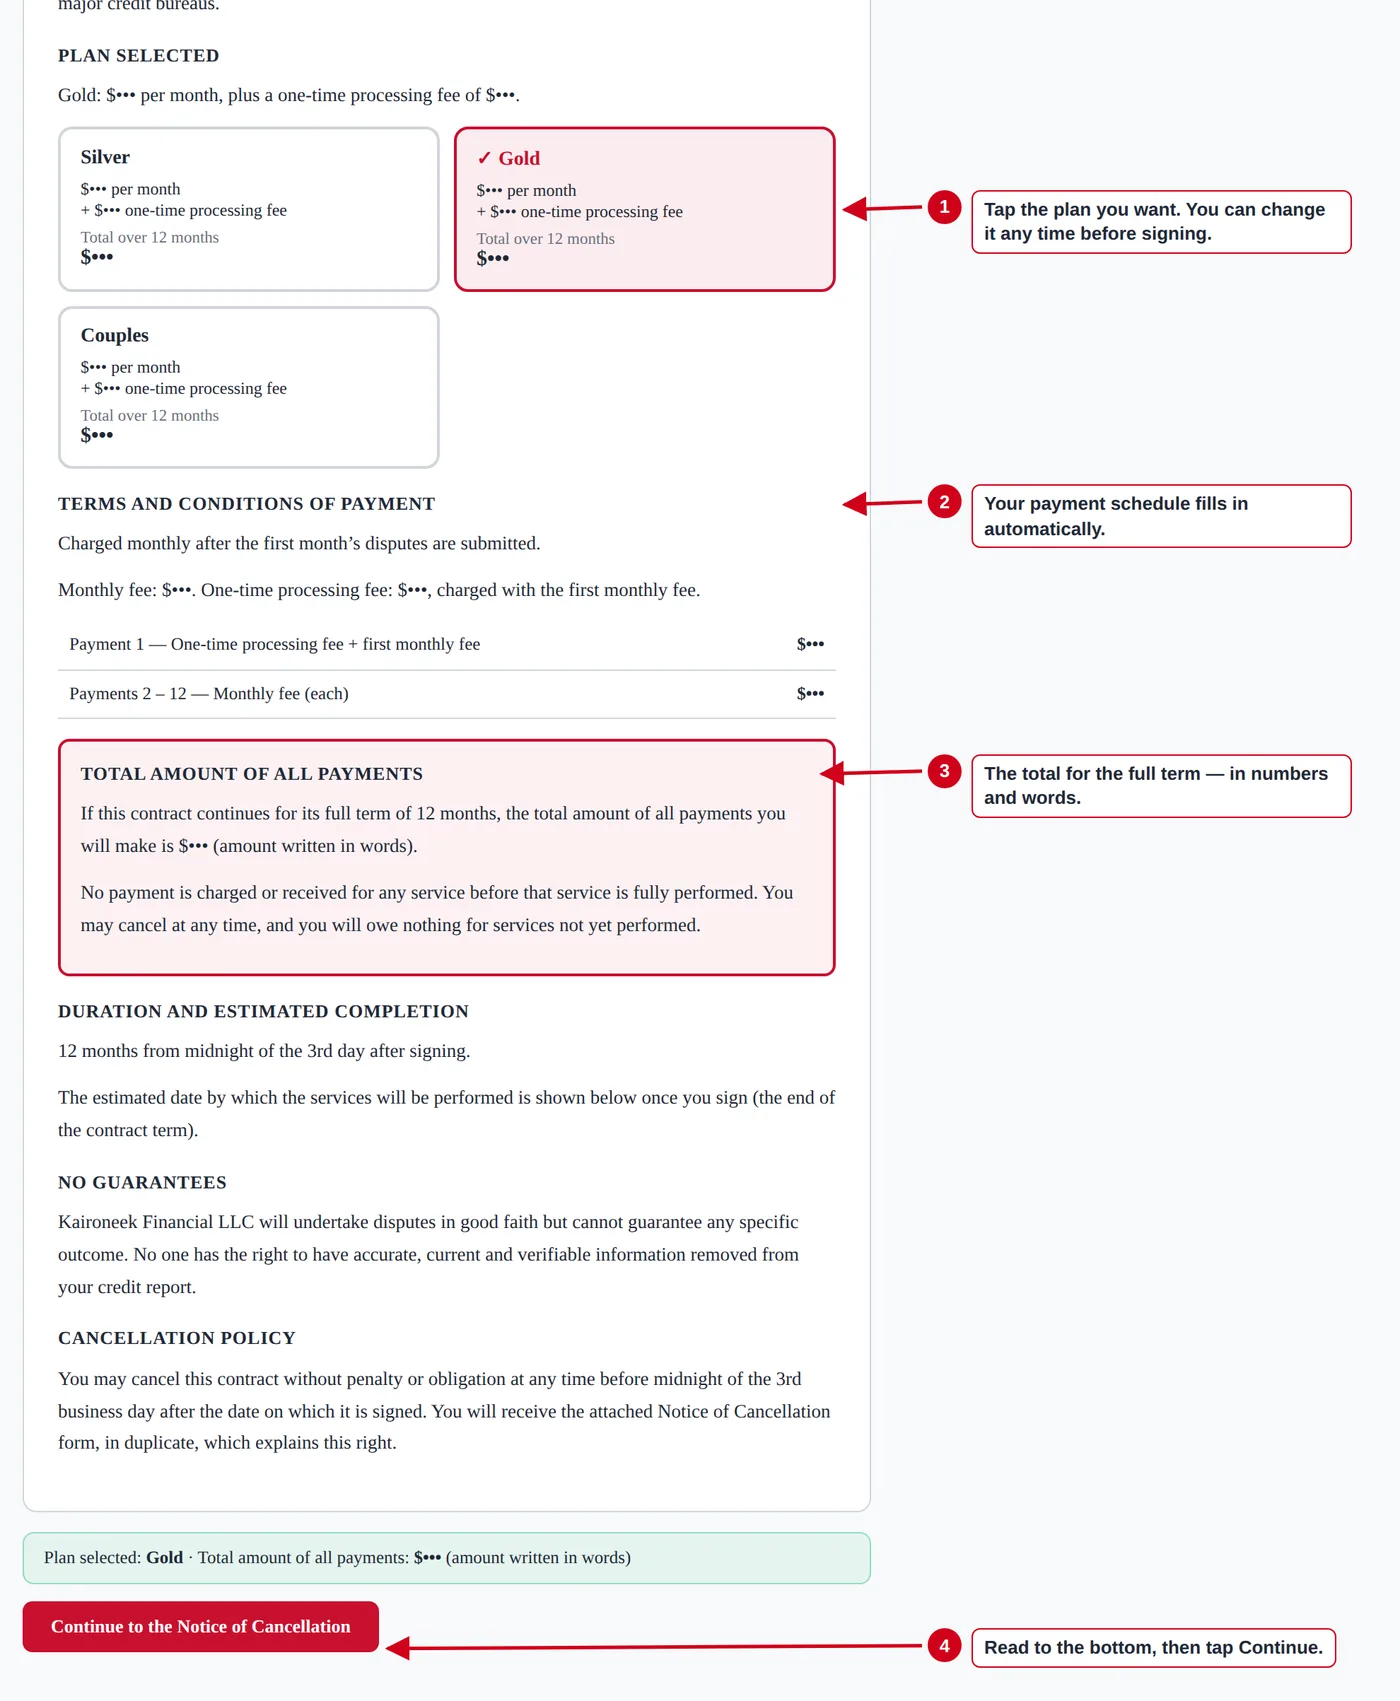
- Choose your plan by tapping it inside the contract. You can change your choice any time before you sign.
- Your payment schedule fills in automatically for the plan you chose.
- The total amount of all payments for the full term appears in numbers and in words.
- Read to the bottom, then tap Continue to the Notice of Cancellation. Next you’ll see the Notice of Cancellation (two copies — keep one) and the privacy notice; check the box on the privacy notice and continue.
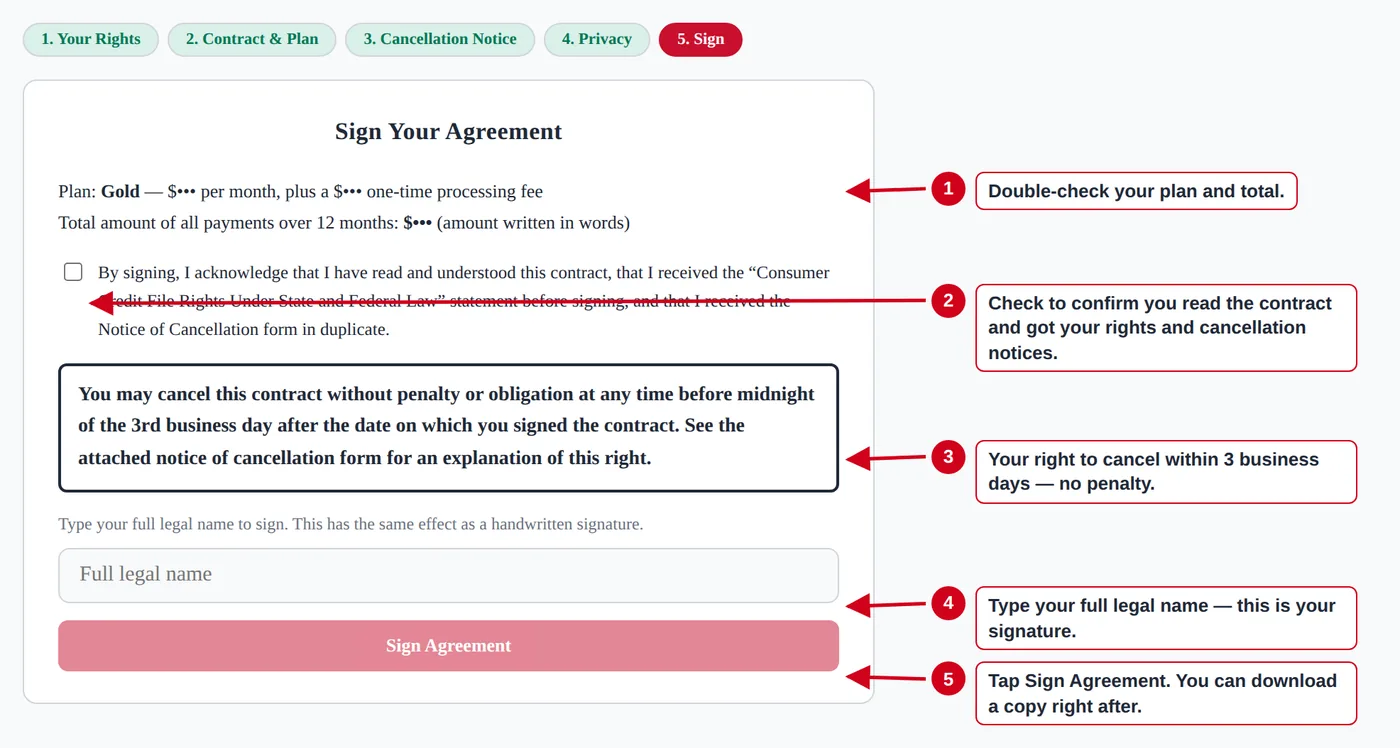
- Double-check your plan and total.
- Check the box confirming you read the contract and received your rights statement and cancellation notice.
- This bold statement is your right to cancel without penalty until midnight of the 3rd business day after you sign.
- Type your full legal name — this is your signature.
- Tap Sign Agreement. You can download or print your signed copy right away, any time after.
Set up credit monitoring and add your report
We work from your current three-bureau reports. In your portal, find My Credit Reports.
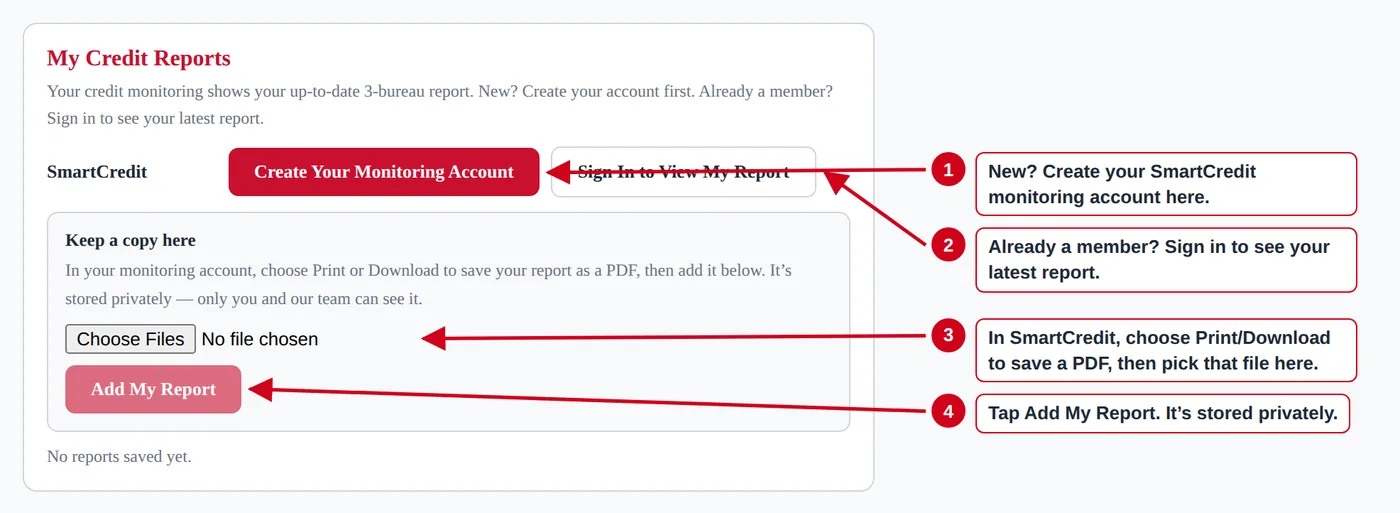
- New to credit monitoring? Tap Create Your Monitoring Account and sign up with SmartCredit (the monitoring fee is paid directly to the monitoring company).
- Already a member? Tap Sign In to View My Report.
- In your monitoring account, choose Print or Download to save your report as a PDF, then pick that file here.
- Tap Add My Report. It’s stored privately — only you and our team can see it — and you can view or download it any time.
Upload your documents
In your portal, find My Documents. You’ll need your photo ID and a proof of address.
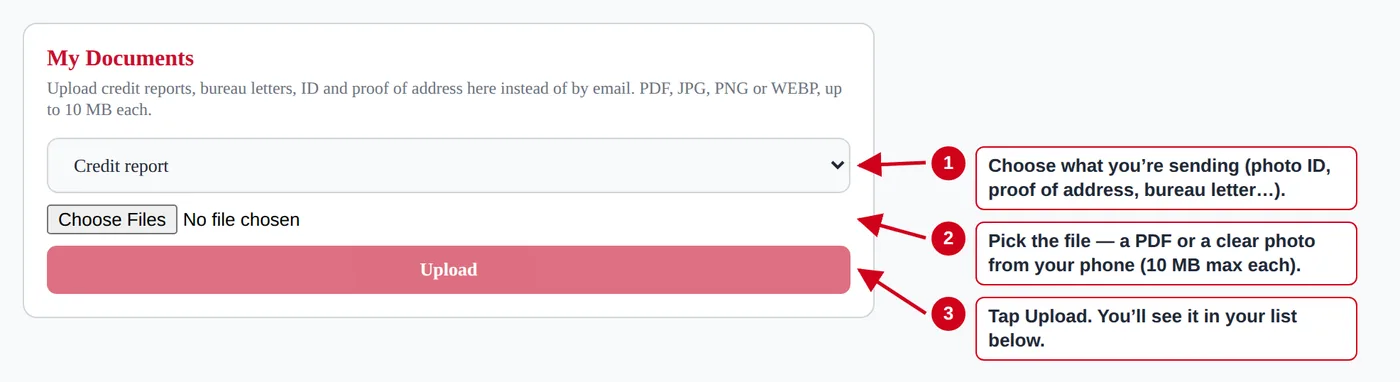
- Choose what you’re sending — photo ID, proof of address, a letter from a bureau or creditor, and so on.
- Pick the file — a PDF or a clear phone photo (flat, good light, all four corners showing), up to 10 MB each.
- Tap Upload. It appears in your list below. Every file is checked for viruses and stored privately.
Add your card
In your portal, find Billing.
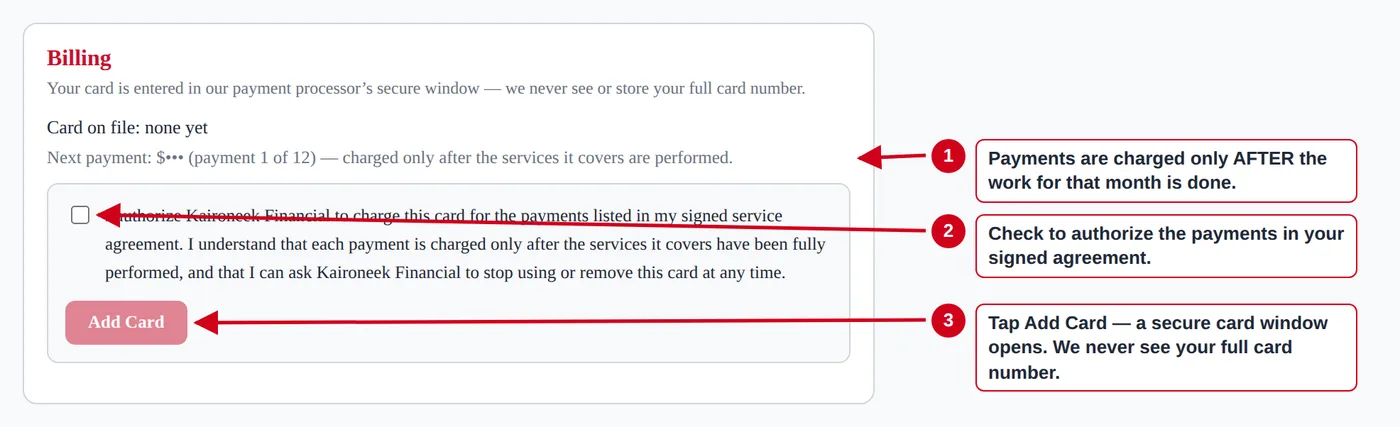
- Your next payment is shown here. By law, each payment is charged only after the work for that period is done — never in advance.
- Check the box to authorize the payments listed in your signed agreement.
- Tap Add Card. A secure card window from our payment processor opens — we never see or store your full card number. Your receipts appear here after each payment.
Tip: That’s it — you’re signed up! We’ll post updates in your portal and email you when there’s something new. You can message us any time from Secure Messages in your portal.
If something goes wrong
I didn’t get the 6-digit code email.
My code says it’s wrong or expired.
It says my account is locked.
I forgot my password.
My password isn’t accepted.
“An account with this email already exists.”
I signed up with Google, Apple, Yahoo or Microsoft — do I need a password?
I changed phones and can’t get my two-step code.
My document or photo won’t upload.
My video won’t upload (reviews).
The page looks stuck or a button doesn’t work.
I don’t see the plan buttons in my agreement.
Where do I find my signed agreement later?
The card window won’t open (Billing).
I made a mistake on my free assessment.
Still stuck? Read our complete FAQ, ask the “Questions? Ask us” assistant at the bottom of any page, or send us a message.
Ready to take control of your credit?
Start your credit transformation today. We will review your situation and show you your options — honestly.